Studies show that 73% of craft enthusiasts prefer projects that combine decoration with functionality. You’ll find that clay unicorn magnets perfectly embody this dual-purpose approach, offering both whimsical charm and practical utility for your magnetic surfaces. While traditional refrigerator magnets might seem mundane, these handcrafted pieces transform everyday organization into an expression of personal creativity. Let’s explore how you can craft these magical accessories that blend form and function.
Key Takeaways
- Clay unicorn magnets are beginner-friendly crafts requiring air-dry clay, acrylic paint, small magnets, and basic tools to create decorative fridge ornaments.
- The project takes less than an hour to complete, making it perfect for quick crafting sessions or group activities.
- Start by shaping 2-inch clay circles into unicorn faces, adding details like manes and horns before letting them dry.
- Paint the dried clay unicorns with a base coat and decorative details, then attach magnets with strong craft glue.
- These magnets blend functionality with whimsical design, serving as both decorative pieces and practical holders for notes or photos.
History
Three distinct art forms converged to create the modern clay unicorn magnet: traditional clay sculpting, decorative refrigerator magnets that emerged in the 1940s, and the mythological unicorn depicted in ancient Mesopotamian art.
You’ll find that clay crafting dates back over 20,000 years, while the first commercial refrigerator magnets didn’t appear until after World War II. The magnetic backing revolutionized how we display items in our homes, transitioning from simple utility to decorative art.
The unicorn’s cultural significance spans millennia, appearing in Persian mythology as early as 400 BCE. When you combine these elements, you’re participating in a craft that bridges ancient artistic traditions with modern functionality.
Today’s clay unicorn magnets represent this perfect fusion of historical artistry and contemporary practicality, allowing you to create pieces that are both meaningful and useful.
Project
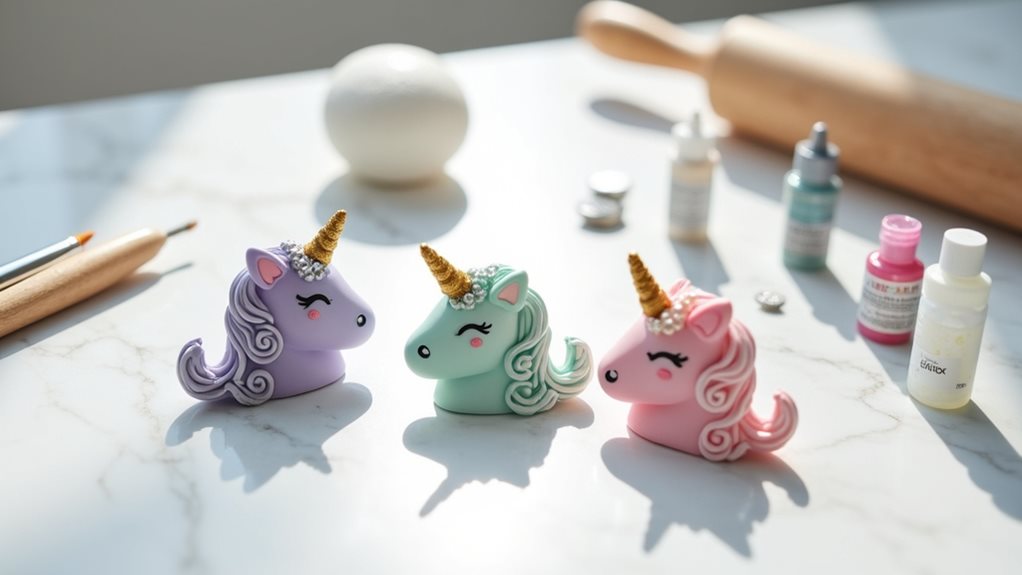
Creating whimsical unicorn magnets from air-dry clay transforms ordinary magnetic surfaces into enchanted display spaces. These decorative pieces serve both as functional organizational tools and charming room accessories, perfect for holding notes, photos, or artwork while adding a magical touch to any space.
This beginner-friendly craft project takes less than an hour to complete and requires no special equipment or firing. The simple design can be customized with various colors and patterns, making it an ideal activity for both adults and children who want to express their creativity while making something useful.
- White air-dry clay (4 oz/113 g)
- Acrylic paint set (basic colors)
- Small round magnets (½ inch/12 mm diameter)
- Strong craft glue
- Small rolling pin (or smooth glass jar)
Roll the clay to ¼ inch (6 mm) thickness and cut 2-inch (5 cm) circles for the base. Create small details like the horn, ears, and mane by rolling and shaping tiny clay pieces, then attach them to the base using light pressure and a small amount of water to secure.
Allow pieces to dry completely for 24-48 hours, then paint with your chosen colors and designs, adding facial features and details. Once the paint has dried thoroughly, attach magnets to the back using strong craft glue and allow to set completely before use.
Working on a non-stick surface like wax paper prevents the clay from sticking during shaping, and keeping tools clean ensures smooth results. Avoid using excessive water when joining pieces, as this can weaken the clay structure.
Store any unused clay in an airtight container to maintain workability, and consider applying a clear acrylic sealer to finished pieces for added durability and protection against handling.
Project Steps
You’ll start your unicorn magnet project by gathering your materials, including air-dry clay, paint, magnets, and adhesive.
Next, you’ll shape and detail your clay pieces, rolling them into circles before adding the unicorn’s distinct features like the horn, ears, and mane.
Letting them dry completely before painting them in your chosen colors.
Once your painted unicorns are dry, you’ll transform them into functional decorations by securing small magnets to their backs with strong craft glue.
Step 1. Gather Crafting Materials Needed
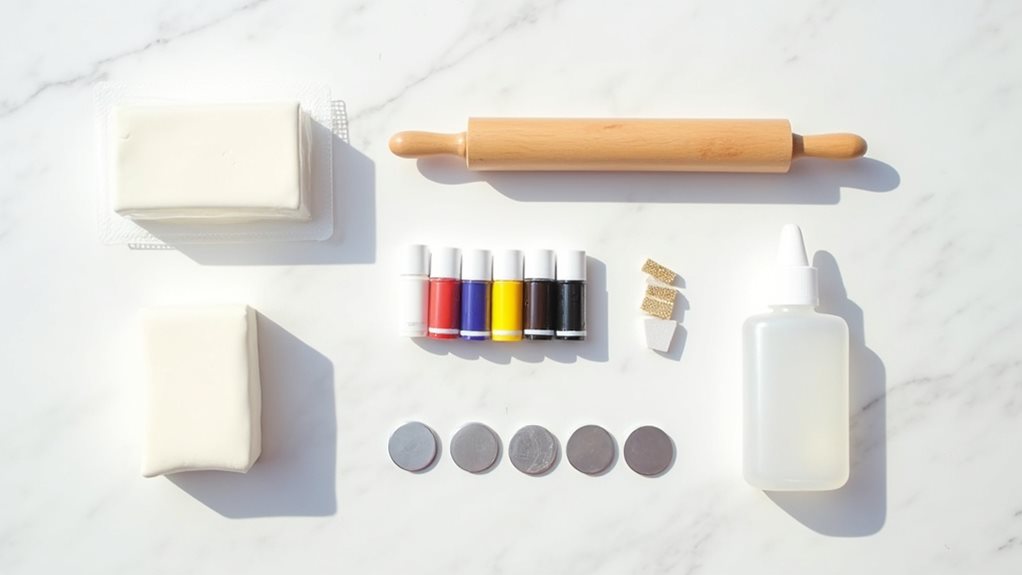
Before diving into the creative process, gather all essential materials in one organized workspace to ensure a smooth crafting experience. You’ll need high-quality white air-dry clay, a set of acrylic paints with basic colors, and small round magnets that are ½ inch in diameter. Don’t forget to include strong craft glue, a small rolling pin or smooth glass jar, and a non-stick work surface like wax paper or a plastic craft mat.
You’ll also want to have a small bowl of water nearby for smoothing edges, plus basic crafting tools such as a knife for cutting shapes and small brushes for painting details. If you’re planning to seal your finished pieces, add a clear acrylic sealer to your supplies list for enhanced durability.
Step 2. Roll Clay Into Circles
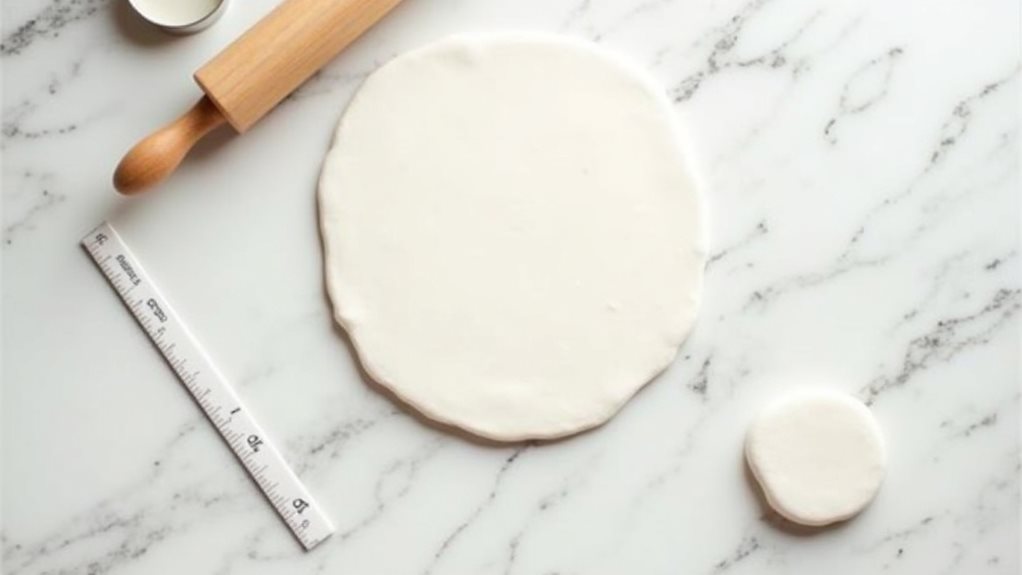
Start by rolling a portion of the white air-dry clay between your palms to form a smooth ball about the size of a golf ball.
Place the ball on your non-stick work surface, then use your rolling pin or glass jar to flatten it into an even layer approximately ¼ inch thick. You’ll want to apply steady, consistent pressure while rolling to ensure uniform thickness throughout.
Once you’ve achieved the desired thickness, use a circular cutter or the rim of a drinking glass to cut out 2-inch circles from the clay.
If you don’t have a proper cutter, you can trace around the bottom of a glass with a knife. Remember to lift the cut circles carefully from your work surface to maintain their shape, and place them on wax paper to begin drying.
Step 3. Shape Unicorn Facial Features
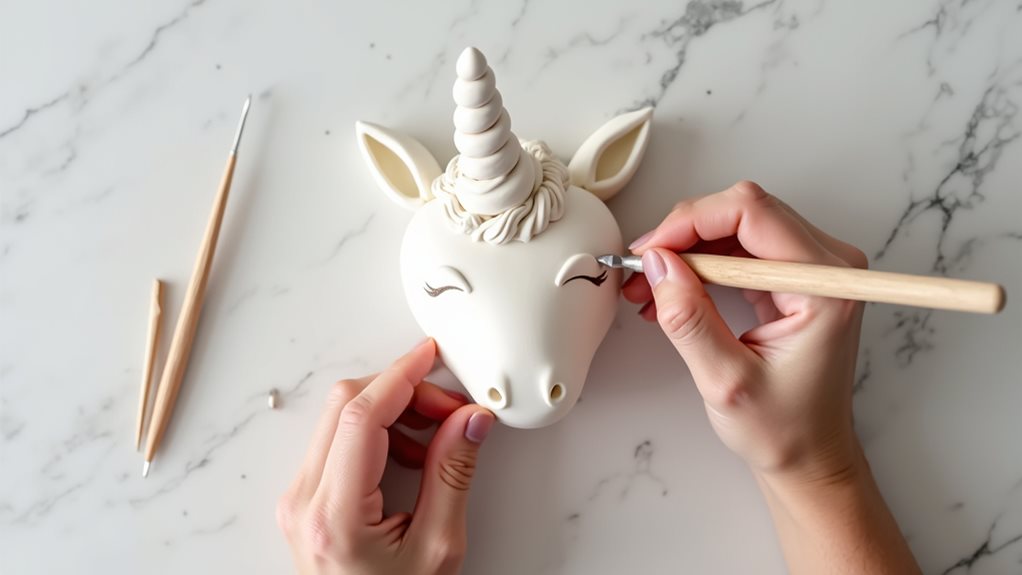
Creating the unicorn’s adorable facial features brings your magical creature to life through careful detailing and gentle shaping techniques.
Start by forming small indentations for the eyes, approximately one-third down from the top of your circular clay piece. Using a toothpick or thin modeling tool, create gentle curves for eyelashes above each eye.
Next, pinch a tiny amount of clay into a delicate triangle for the nose, placing it in the center below the eyes.
Add dimension to your unicorn’s face by creating subtle contours around the cheeks and forehead. You’ll want to smooth these areas carefully with your fingertip, maintaining soft transitions between features.
Don’t forget to add a gentle smile line beneath the nose, curving it slightly upward for that characteristic unicorn charm.
Step 4. Paint Dried Unicorn Shapes
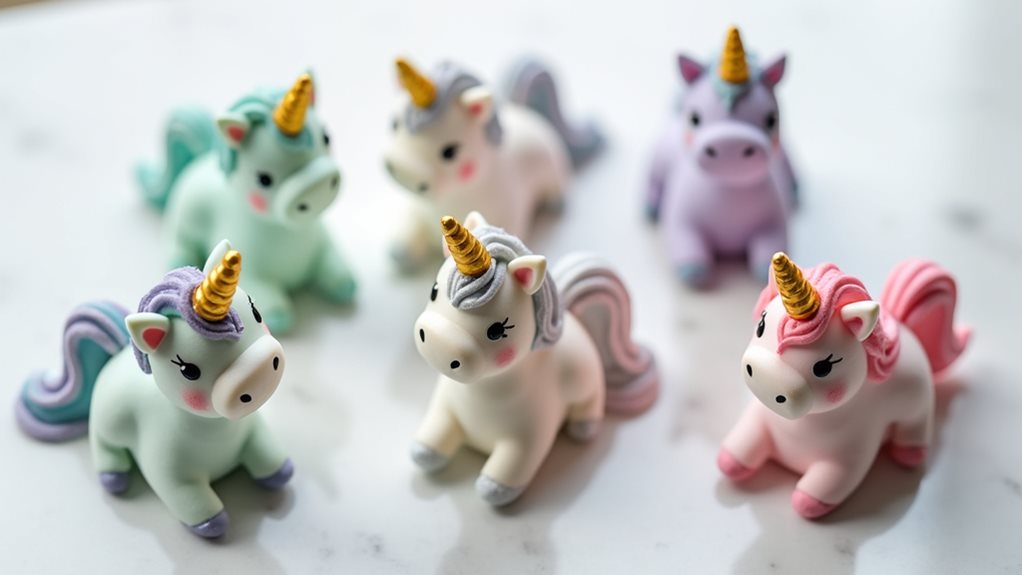
Once your clay unicorn shapes have dried completely, the magical transformation through color can begin. Start by painting the base coat in white or your preferred unicorn body color, allowing it to dry fully before adding details.
You’ll want to work in layers, building up the colors gradually for the best results.
Next, paint the horn in metallic gold or silver, and add soft pastel colors to the mane and ears. Create depth by using slightly darker shades in the creases of the mane.
Don’t forget to paint adorable facial features – use black for the eyes and eyelashes, pink for the cheeks, and add a gentle smile.
If you make any mistakes, you can easily cover them with another layer of paint once the first layer dries.
Step 5. Attach Magnets With Glue
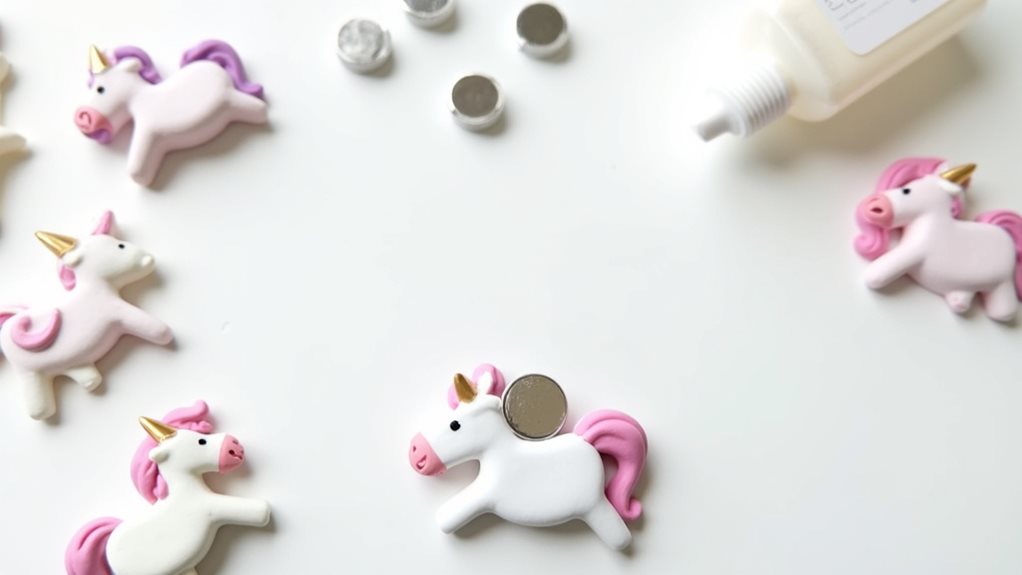
The final assembly of your clay unicorn magnets requires three essential steps, beginning with the careful selection of strong craft adhesive suitable for both clay and magnetic surfaces.
First, apply a small amount of glue to the flat side of each magnet, ensuring you’re using enough to create a secure bond without excess that might squeeze out the sides.
Next, position each magnet carefully in the center of your painted unicorn‘s back, pressing firmly but gently to avoid cracking the clay.
Finally, place your magnets face-down on a flat surface and allow them to cure completely according to your adhesive’s instructions, typically 24 hours for maximum strength.
Don’t rush this drying process, as proper curing time ensures your unicorn magnets will hold securely to any magnetic surface.
Final Thoughts
These delightful clay unicorn magnets won’t just brighten up your refrigerator or magnetic board – they’ll serve as charming reminders of your creative abilities and bring a touch of whimsy to everyday organization.
When you’ve completed your unicorn magnets, you’ll find they’re perfect for hanging artwork, important notes, or cherished photos. You can even create sets in different color schemes to match your decor or give as personalized gifts.
Remember that while this project is beginner-friendly, each unicorn you create will be unique, reflecting your artistic style and improving with practice.
If you’re looking to expand your crafting skills, try experimenting with different clay textures, adding glitter to your paint, or creating themed collections for special occasions.