You’ll discover that creating an air dry ring holder combines both artistic expression and practical organization in your home. While traditional jewelry holders often lack personality, crafting your own piece with air dry clay lets you design a unique storage solution that matches your style. From simple geometric shapes to intricate designs, this versatile project offers endless possibilities for displaying your rings while adding a personal touch to your decor.
Key Takeaways
- Air dry clay requires 24-48 hours of drying time in a well-ventilated area to create a durable ring holder.
- Start with 4 ounces of air dry clay, forming a base circle and vertical cylinder for the holder structure.
- Score and moisten connecting surfaces with water to ensure strong bonding between clay pieces during assembly.
- Seal the finished ring holder with clay sealant if using in moisture-prone areas like bathrooms.
- Allow complete drying before painting with acrylic colors or adding decorative elements to personalize the holder.
History
While the precise origins of decorative ring holders remain somewhat unclear, the practice of creating specialized jewelry storage dates back to ancient civilizations, where craftsmen fashioned elaborate boxes and stands from materials like wood, metal, and clay.
You’ll find that clay ring holders gained popularity during the Arts and Crafts Movement of the late 19th century, when handmade items became symbols of artistic expression and practical utility. During this period, craftspeople began creating more personalized storage solutions for their growing collections of jewelry.
The use of air-dry clay specifically emerged in the mid-20th century, offering you a convenient alternative to traditional kiln-fired ceramics. Today’s DIY ring holders continue this tradition of blending functionality with personal artistic expression, making them popular projects for both beginners and experienced crafters.
Project
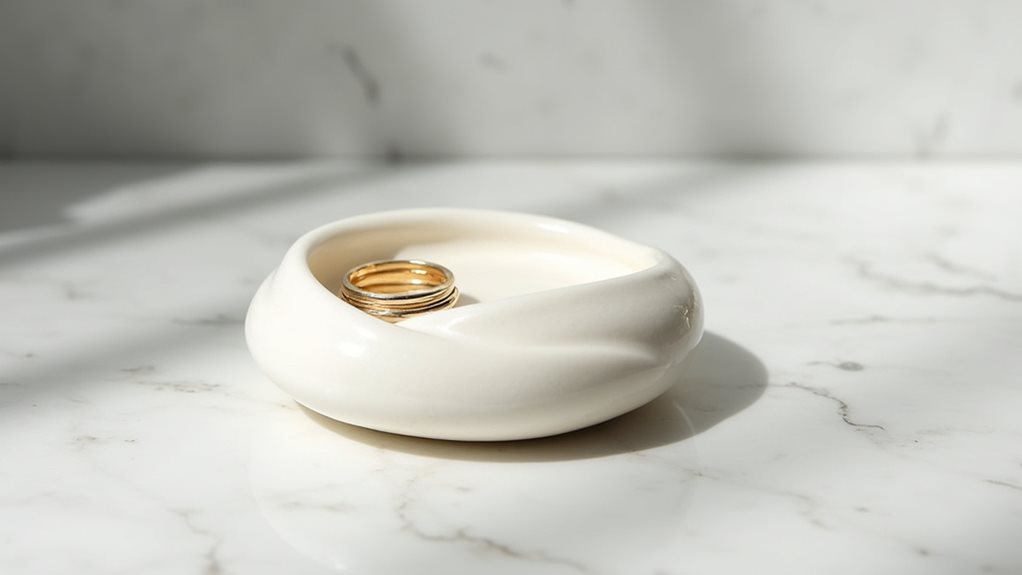
A handmade ring holder crafted from air dry clay offers both functionality and artistic expression for organizing your jewelry collection. This practical piece serves as an elegant solution for keeping rings organized while adding a personalized decorative element to any surface.
The project requires minimal materials and can be completed in about 30 minutes, followed by a 24-48 hour drying period. The design can be adapted to suit various aesthetic preferences, from sleek modern styles to elaborate decorative patterns, making it a versatile addition to any bedroom or bathroom decor.
- Air dry clay (4 oz / 113g)
- Rolling pin or glass bottle (6-8 inches / 15-20 cm)
- Sharp knife or clay cutting tool
- Small bowl of water
- Acrylic paint (optional)
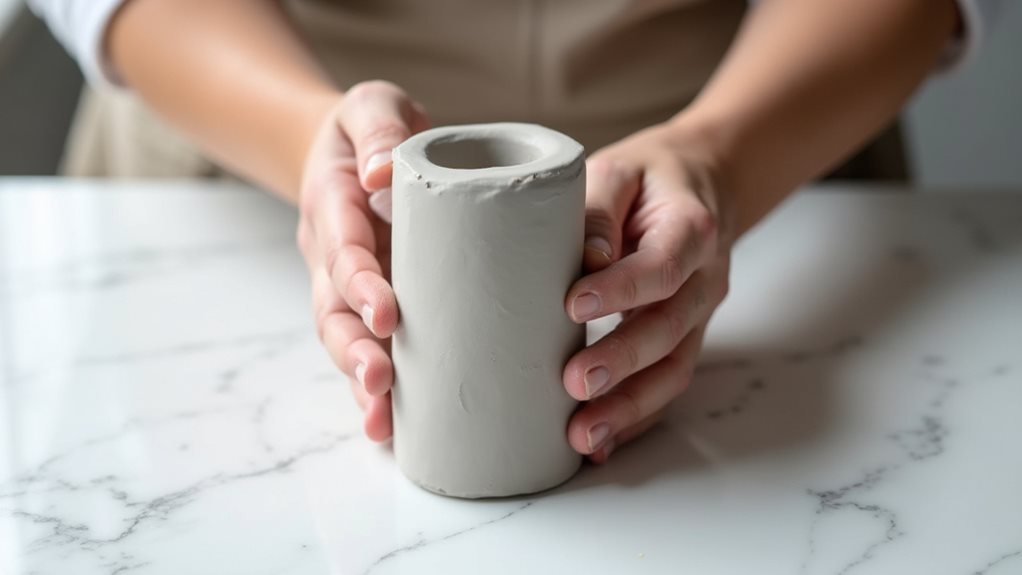
Begin by warming the clay in your hands until pliable, then roll it to 1/4 inch (6mm) thickness. Cut a 4-inch (10cm) circle for the base and form a cylinder measuring 3 inches (7.5cm) tall by 1 inch (2.5cm) in diameter. Score both pieces where they’ll join, apply water to the scored areas, and firmly attach the cylinder to the center of the base.
Shape the cylinder by creating gentle waves or folds, smoothing any rough areas with your fingers, and let the piece dry completely on a flat surface.
Work in a room with moderate humidity and avoid direct sunlight during the drying process. If cracks appear while drying, repair them using a slip made from clay mixed with water.
Once fully dry, the piece can remain natural or be painted with acrylic paint to complement your decor. For bathroom settings or areas with moisture exposure, consider applying a clear acrylic sealer for added protection.
Project Steps
Begin by conditioning the clay in your hands until it’s soft and workable, then roll it into a circle for the base and form a separate cylinder that’ll serve as the vertical support.
Next, you’ll score both pieces where they’ll connect, add water to help them bond, and firmly join them together at the center of the base.
Finally, you’ll create gentle waves or folds in the cylinder by carefully pinching and shaping the clay, transforming your simple structure into an elegant ring holder that’s ready to dry.
Step 1. Condition Clay Until Pliable
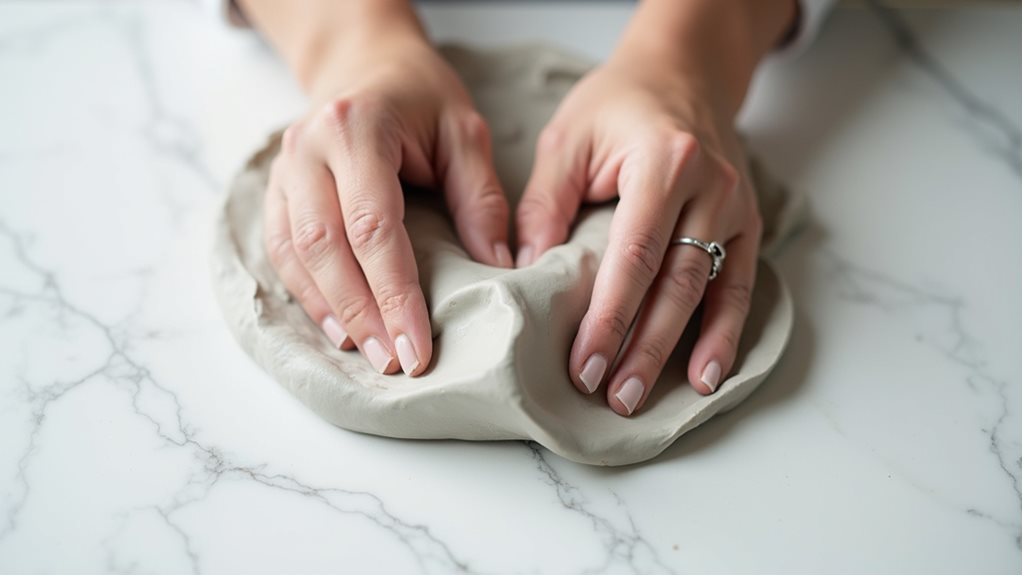
To properly condition your air dry clay, take the entire 4-ounce portion and repeatedly knead it between your palms for 3-5 minutes.
You’ll notice the clay becoming warmer and more flexible as you work it, which indicates it’s reaching the ideal consistency for shaping.
If you’re finding the clay too stiff, break it into smaller chunks and work them individually before combining them back together.
Pay attention to any hard spots or air bubbles you feel while kneading – these need to be worked out completely.
Once the clay feels uniformly soft and pliable, similar to the consistency of modeling clay, it’s ready for rolling.
Don’t rush this conditioning process, as properly prepared clay will be much easier to shape and less likely to crack while drying.
Step 2. Roll Clay Into Circle
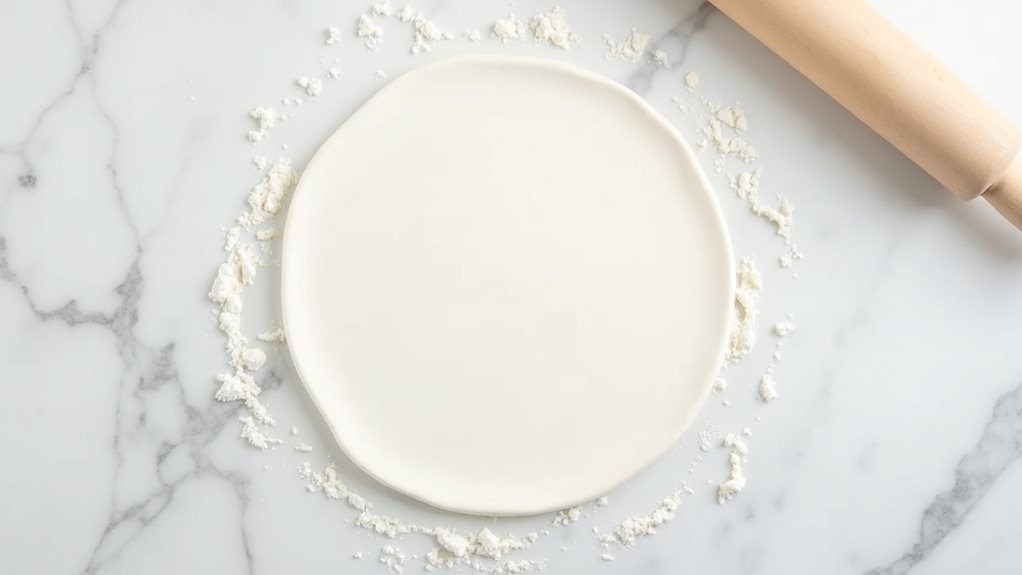
Place your conditioned clay on a smooth, clean work surface, then begin rolling it outward from the center using steady, even pressure with your rolling pin.
Continue rolling until your clay reaches approximately 1/4 inch thickness, maintaining consistent pressure to ensure an even surface throughout. You’ll want to rotate the clay occasionally as you work to create a uniform thickness and prevent sticking.
Once you’ve achieved the desired thickness, you’ll need to cut out a circular shape that’s roughly 4 inches in diameter.
If you don’t have a circular cutter, you can use a small bowl or cup as a template. Simply place it on top of your rolled clay and carefully trace around the edge with your cutting tool, removing any excess clay for later use.
Step 3. Make Cylinder From Clay
Now that your base circle is ready, shaping the vertical component of your ring holder requires careful attention to detail.
Take approximately one-third of your remaining clay and roll it between your palms to form a smooth cylinder about 3 inches tall and 1 inch in diameter. As you’re working, maintain even pressure to ensure consistent thickness throughout the piece.
Check your cylinder’s stability by standing it upright on your work surface – it should remain straight without leaning. If you notice any irregularities, gently roll the cylinder again until it’s uniform.
Once you’ve achieved the desired shape, use your fingertips to create subtle textures or patterns along the surface. You’ll want the cylinder to be sturdy enough to hold multiple rings while maintaining an aesthetically pleasing appearance.
Step 4. Join Pieces With Water
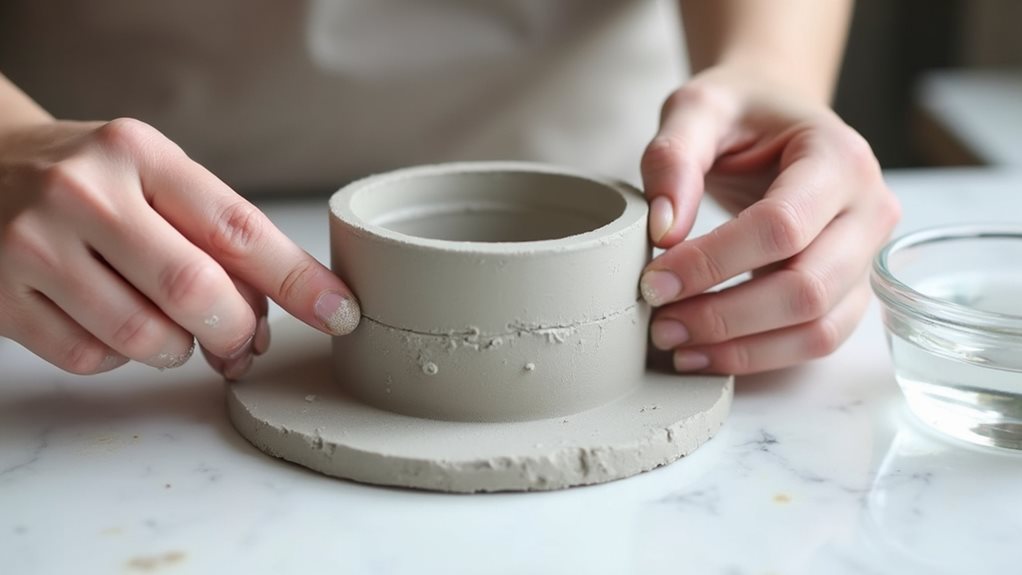
After you’ve prepared both the base circle and cylinder, joining these components requires a careful water-scoring technique that ensures a strong, lasting bond.
Using your clay tool or the tip of a knife, create a crosshatch pattern on both surfaces where the pieces will connect. You’ll want to score about 1/8 inch deep into each surface.
Dip your finger in water and lightly moisten the scored areas, but don’t oversaturate them.
Press the cylinder firmly onto the center of your base, applying even pressure while rotating the piece to secure the connection.
Smooth the seam where the pieces meet by gently running your finger around the joint, removing any excess clay or rough edges that might remain.
Step 5. Shape Clay Into Waves
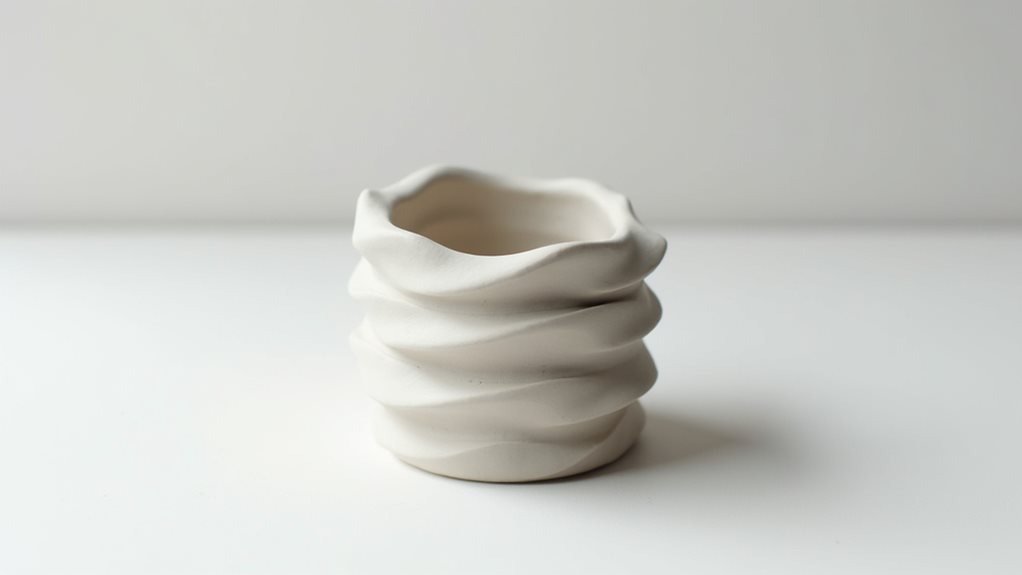
With your cylinder securely attached to the base, shaping the decorative waves begins at the top edge of your ring holder. Using your thumb and forefinger, gently pinch small sections of clay at regular intervals around the cylinder’s rim, pulling slightly outward to create an undulating pattern.
Work your way down the cylinder, alternating the placement of each wave to achieve a natural, flowing appearance. As you shape the waves, don’t hesitate to adjust their depth and spacing until you’re satisfied with the overall look.
If you’d like more pronounced waves, press a bit harder while pinching the clay, or keep the pressure light for subtle ripples. Remember to maintain the cylinder’s structural integrity by avoiding overly deep pinches that might compromise its strength once dried.
Final Thoughts
Creating a personalized ring holder from air dry clay provides both a practical storage solution and an opportunity to express your creativity through handmade decor.
You’ll find that this project offers endless possibilities for customization, from adding textures and patterns to choosing colors that complement your space. Once you’ve mastered the basic technique, you can experiment with different heights, shapes, and decorative elements to create multiple holders for various jewelry types.
Remember to give your piece adequate drying time, and don’t hesitate to make adjustments while the clay is still workable.
If you’re planning to use your ring holder in a bathroom, make sure to seal it properly to protect against moisture.
With proper care, your handmade ring holder will serve as a functional and artistic addition to your home for years to come.