While mermaids have captivated human imagination for centuries, their mysterious eggs remained largely unexplored in artistic representations until the rise of crafting communities online. You’ll discover that creating mermaid eggs from air dry clay offers a perfect blend of whimsy and sophisticated design, allowing you to fashion decorative pieces that capture the essence of maritime mythology. As you explore this unique craft, you’ll uncover techniques for achieving both realistic textures and ethereal finishes that transform simple clay into enchanted treasures.
Key Takeaways
- Air dry clay mermaid eggs are decorative pieces featuring scale patterns that transform clay into mystical treasures resembling mythical sea creature eggs.
- The basic materials needed are white air dry clay, pearl finish paint, sculpting tools, clear sealant, and fine-grit sandpaper.
- Start by shaping clay into an egg form, carve scale patterns, let dry 24-48 hours before sanding and painting.
- Apply two coats of pearl finish paint and seal with clear gloss for a luminous, professional appearance.
- Each piece can be customized through different colors, sizes, and textures while embracing natural variations in the design.
History
While the concept of mermaid eggs has roots in maritime folklore dating back centuries, crafting decorative versions from air dry clay emerged as a popular DIY trend in the early 2010s alongside the rise of coastal-themed home décor.
You’ll find that these artistic interpretations draw inspiration from ancient sailors’ tales of mysterious egg-like objects washing ashore, which they’d often attribute to mythical sea creatures.
The craft gained significant momentum through social media platforms, where artisans began sharing their unique takes on these mystical creations.
What started as simple clay spheres evolved into intricate designs incorporating scale patterns, pearl finishes, and even embedded crystals.
You’ll notice that modern interpretations often reflect both traditional mermaid lore and contemporary artistic techniques, creating pieces that bridge historical mythology with current crafting practices.
Project
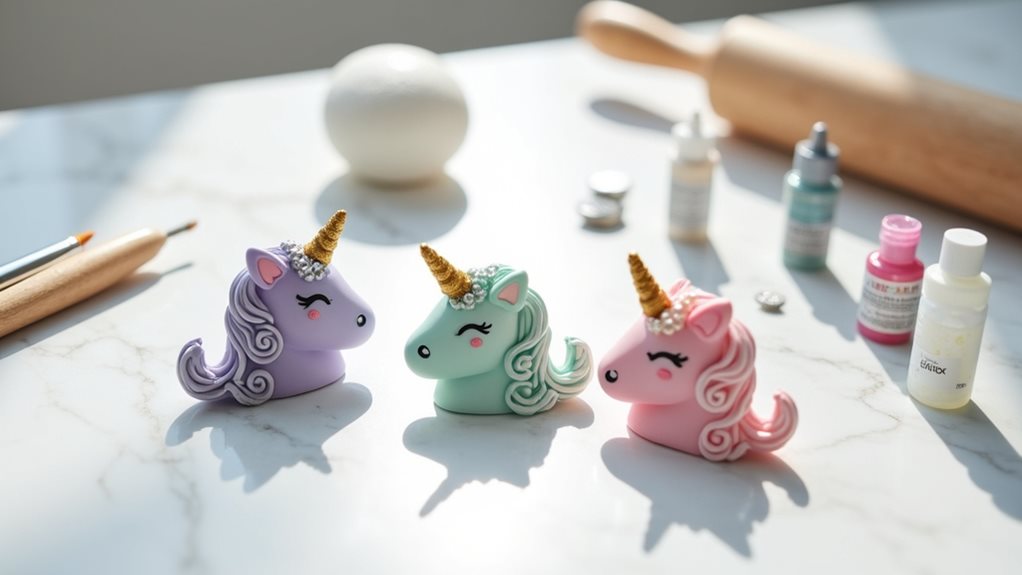
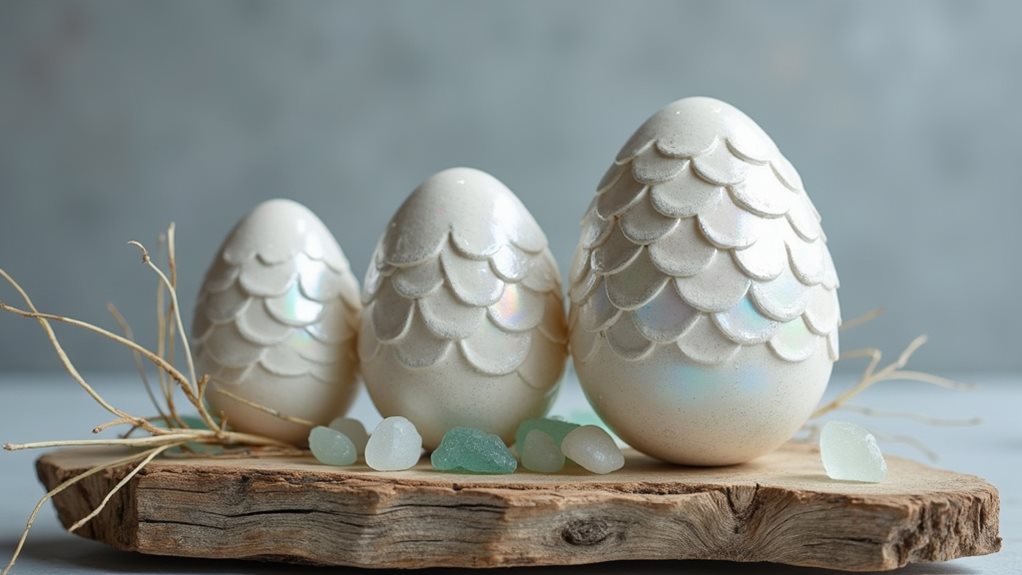
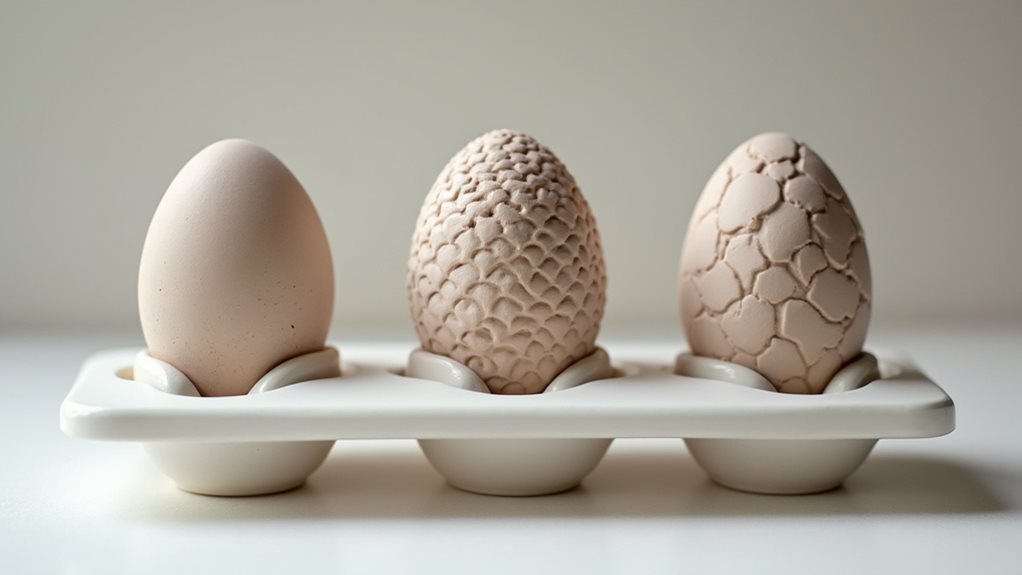
These enchanting mermaid eggs transform simple air dry clay into mystical treasures that appear to have emerged from the depths of an underwater kingdom. Each handcrafted piece captures the ethereal beauty of marine mythology while providing an accessible craft project for artists of any skill level.
The finished eggs, approximately the size of duck eggs, feature delicate scale patterns and a luminous, pearl-like finish that catches the light beautifully. These decorative pieces make stunning additions to coastal-themed displays, seasonal arrangements, or can serve as unique conversation-starting paperweights that bring a touch of oceanic wonder to any space.
Materials:
- White air dry clay (8 oz/227g block)
- Pearl finish acrylic paint (2 fl oz/59ml)
- Small sculpting tool or butter knife
- Clear gloss sealant (2 fl oz/59ml)
- Fine-grit sandpaper (220 grit)
Begin by separating a golf ball-sized portion of clay and rolling it between your palms until smooth. Then shape it into an egg form by applying gentle pressure to one end; use your sculpting tool to create overlapping curved lines across the surface to form a scale pattern. Allow the piece to dry completely for 24-48 hours.
Sand any rough areas with fine-grit sandpaper. Apply two coats of pearl finish paint, allowing each to dry thoroughly. Finish with a protective layer of clear sealant for added durability and shine.
For best results, work in a cool, dry environment to prevent the clay from becoming too sticky during shaping. Position the eggs on a slightly curved surface while drying to maintain their rounded form without developing flat spots.
If the clay begins to dry while working, lightly moisten your fingers with water to smooth any imperfections, but use water sparingly as excess moisture can weaken the clay’s structure and compromise the final result.
Project Steps
You’ll start by breaking off and rolling a golf ball-sized portion of clay into an egg shape, working carefully to maintain smooth surfaces and proper proportions.
Next, you’ll create overlapping scale patterns across the surface using your sculpting tool, making sure the indentations are uniform and evenly spaced.
After the clay has dried completely and you’ve sanded any rough spots, you’ll apply two coats of pearl finish paint followed by a protective clear sealant to achieve that magical mermaid egg shine.
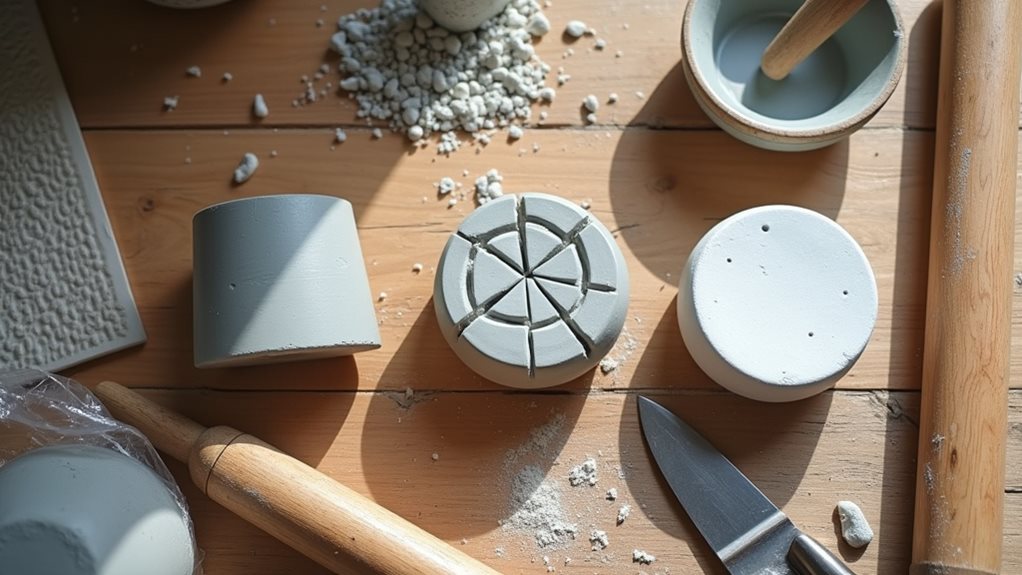
Step 1. Break and Roll Clay
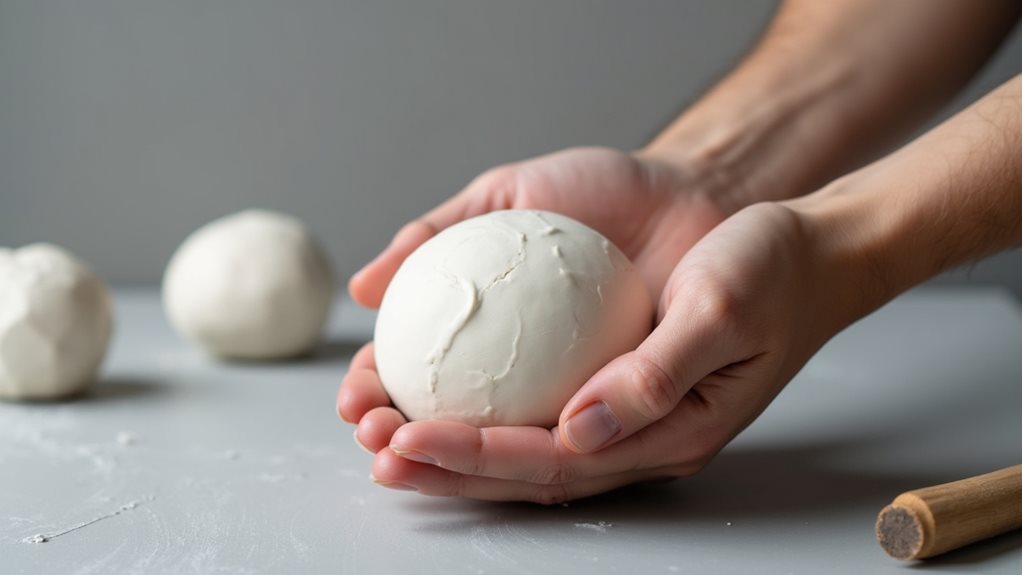
Begin your mermaid egg creation by separating a golf ball-sized portion of air dry clay from the main block.
Work this piece between your palms, using a gentle rolling motion to form it into a smooth, even ball. You’ll want to ensure there aren’t any visible cracks or seams in the surface.
Once you’ve achieved a perfect sphere, start applying slightly more pressure to one end while continuing to roll the clay. This pressure differential will gradually transform your ball into an egg shape, with one end becoming slightly more tapered than the other.
If you notice any imperfections during shaping, smooth them out with your fingertips using light, circular motions. The final egg should measure approximately 2-3 inches in length, matching the size of a typical duck egg.
Step 2. Shape Scales With Tool
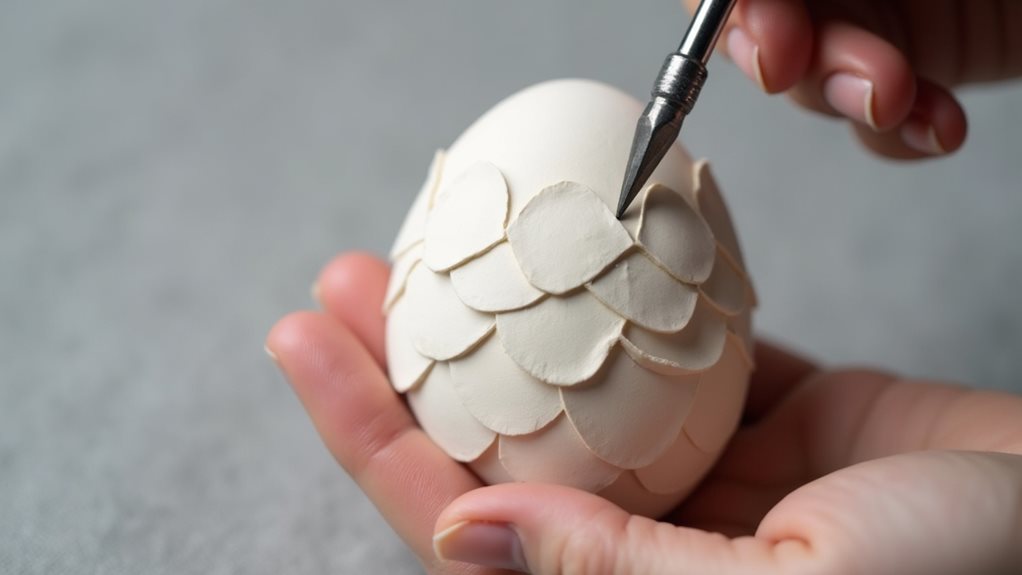
Pressing your sculpting tool gently against the dried clay egg’s surface, create a series of overlapping curved lines that form a delicate scale pattern.
Begin at the top of the egg, working your way down in rows that curve naturally around the shape. You’ll want to maintain consistent pressure to achieve uniform depth in each scale impression.
Continue the pattern across the entire surface, ensuring each new row of scales slightly overlaps with the previous one. If you make a mistake, don’t worry – you can smooth the area with your finger and try again.
For the most realistic effect, vary the size of the scales slightly, making them larger in the middle of the egg and smaller toward the ends, just as you’d find on a real fish or mermaid’s tail.
Step 3. Allow Clay to Dry
After completing the scale pattern, place your mermaid egg in a well-ventilated area where it won’t be disturbed for 24-48 hours.
Position the egg on a slightly curved surface, like a small bowl lined with parchment paper, to prevent flat spots from forming during the drying process.
You’ll know your egg is fully dry when it feels firm to the touch and has changed to a lighter color throughout.
If you’re working in humid conditions, you may need to extend the drying time by an additional day.
Don’t try to speed up the process with heat, as this can cause cracking.
While waiting, rotate the egg once during the drying period to ensure even curing, being careful not to damage the delicate scale pattern you’ve created.
Step 4. Sand Rough Spots
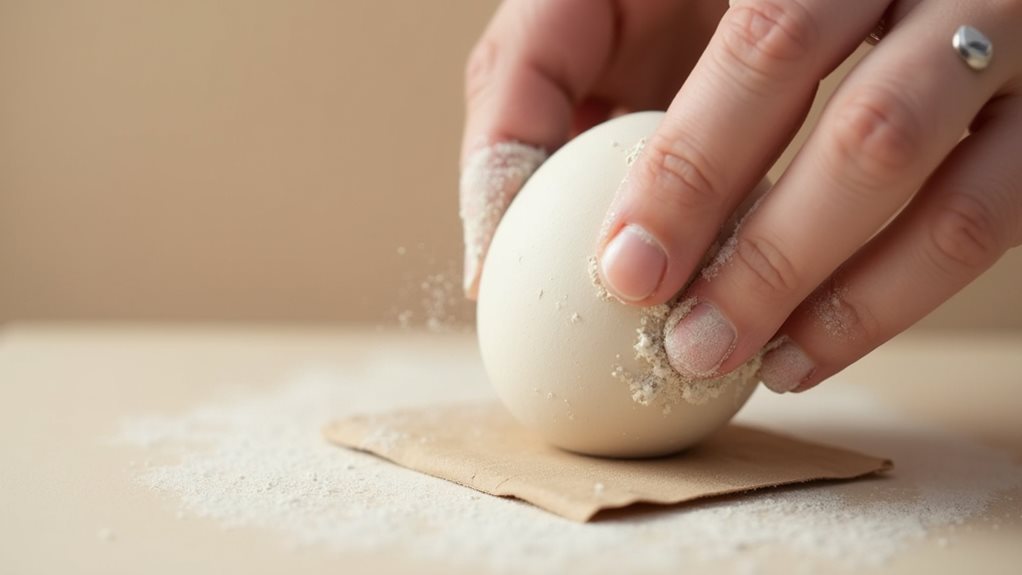
Gentle sanding transforms your dried mermaid egg into a polished masterpiece ready for painting.
After your clay has completely dried, examine the surface for any rough patches, bumps, or uneven areas that might detract from the final appearance.
Using 220-grit sandpaper, work in small circular motions across the egg’s surface, paying special attention to any visible imperfections.
Don’t press too hard, as you’ll want to maintain the delicate scale pattern you’ve created.
Focus particularly on smoothing the areas where you may have joined pieces of clay together or where fingerprints might’ve left unwanted texture.
Once you’ve achieved a uniform surface, wipe away any dust with a soft, dry cloth before moving on to the painting stage.
Your mermaid egg should now feel smooth to the touch while retaining its intentional decorative elements.
Step 5. Paint and Seal Eggs
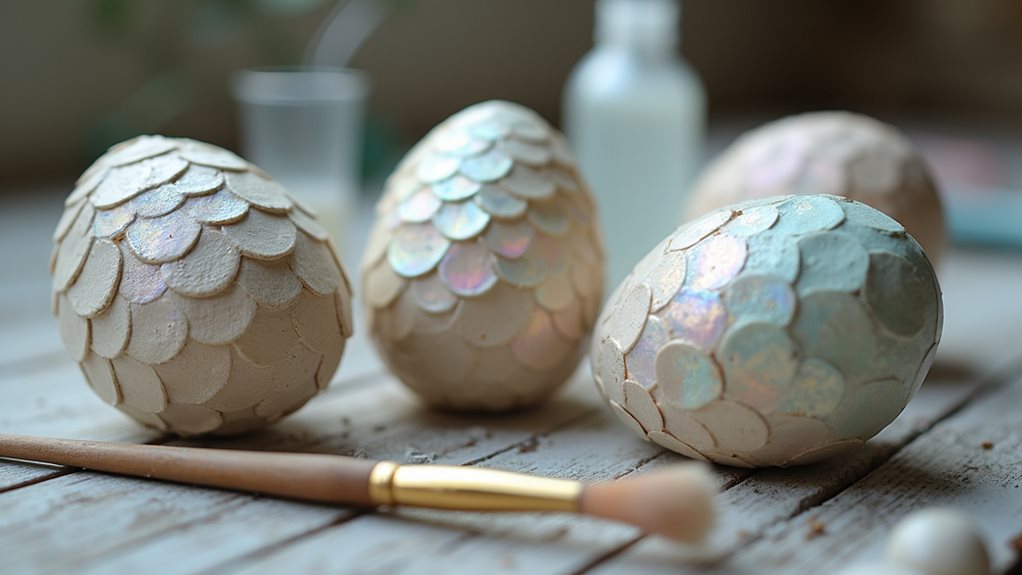
The transformation of your mermaid egg reaches its pinnacle with the application of paint and sealant. Start by applying a thin, even coat of pearl finish acrylic paint using gentle brushstrokes, ensuring you’ve covered all surfaces, including any detailed scale work.
Allow this first layer to dry completely for about two hours before adding a second coat for enhanced depth and coverage.
Once your paint layers have fully dried, it’s time to protect your creation with a clear gloss sealant. Apply the sealant in smooth, consistent strokes, working from top to bottom to avoid drips.
You’ll want to apply a single generous coat, ensuring every surface is protected while maintaining the delicate details of your scales. Let the sealant cure for 24 hours before handling your completed mermaid egg.
Final Thoughts
Making mermaid eggs from air dry clay offers a delightful way to bring mythical elements into your home decor while developing valuable sculpting skills.
You’ll find that each egg becomes more refined as you practice the techniques, allowing you to create increasingly intricate scale patterns and smoother surfaces.
Whether you’re crafting these eggs for personal enjoyment or as unique gifts, you’ll discover that the process teaches patience and attention to detail.
Don’t be discouraged if your first attempts aren’t perfect – the organic nature of these decorative pieces means that slight variations add character and charm.
As you continue exploring this craft, you’ll develop your own style and may even experiment with different colors, sizes, and surface textures to create your personal collection of mystical mermaid eggs.