This season, you can create a whimsical winter wonderland by crafting unique ornaments that reflect your personal style. Start with air dry clay ornaments, molded into stars, animals, or holiday figures, and add a pop of color with non-toxic acrylic paints. Next, incorporate coastal elements like seashells or driftwood for a beachy vibe. Try your hand at painting techniques like rubber band stripes or caviar-filled circles, and add a glossy finish with top coat. From jumbo finial makeovers to oversized wreaths made from pool noodles, these 10 whimsical ornament projects will inspire you to unleash your creativity – and discover even more magic as you explore further.
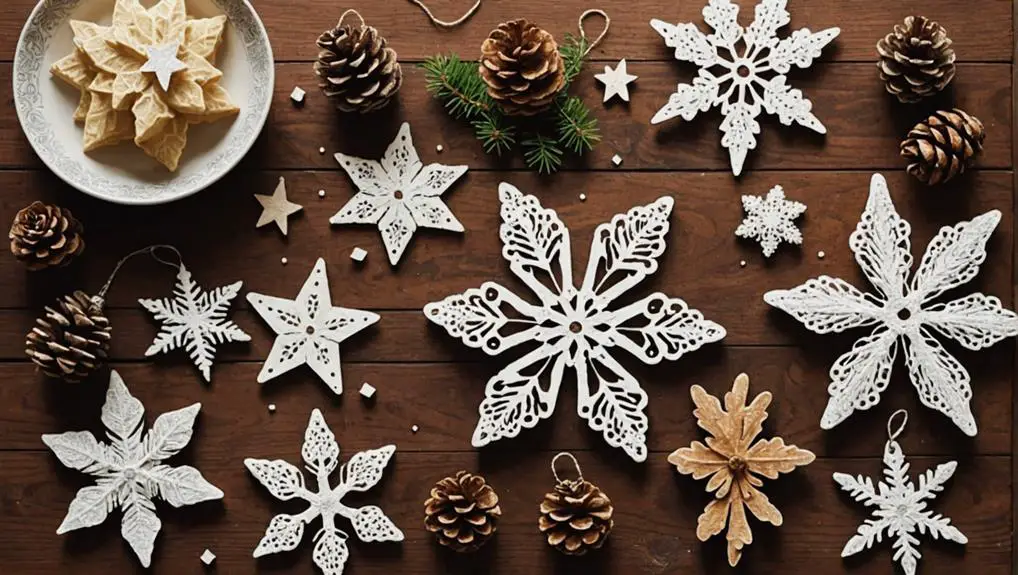
Whimsical Air Dry Clay Ornaments
As you dive into the world of DIY Christmas ornaments, why not start with a project that sparks imagination and creativity?
Whimsical air dry clay ornaments are a fantastic way to add a personal touch to your holiday decor. Simply mold the clay into fun shapes like stars, animals, or holiday figures that reflect the festive season. Allow the formed ornaments to air dry for 24-48 hours, depending on the thickness of the clay, ensuring they harden completely before painting or decorating.
Use non-toxic acrylic paints to add vibrant colors and details to your creations, allowing for personalization and festive flair. Take it to the next level by incorporating elements like glitter, sequins, or stamped designs on the clay before it dries, adding an extra layer of whimsy to your ornaments.
Once finished, string your creations with twine or ribbon for hanging, and admire the handmade touch they bring to your whimsical Christmas decor. With air dry clay ornaments, the possibilities are endless, and the result is a truly unique and imaginative holiday decoration.
Jumbo Finial Ornament Makeover
Take your DIY Christmas ornament skills to new heights with a Jumbo Finial Ornament Makeover. You can transform plain gold finial ornaments from Homegoods into whimsical masterpieces with a little creativity and some painting magic.
To get started, apply Slick Stick as a primer to ensure the paint adheres to the slick metal surface. Then, use a heat gun to quickly dry the paint, and opt for Fluff by Dixie Belle for a soft, matte finish.
Create horizontal stripes by masking off sections with rubber bands, making sure to have an even number of stripes to avoid color repetition. Once you've achieved the desired design, seal your ornament with two coats of Dixie Belle's Top Coat for added shine and a polished festive look.
Your Jumbo Finial Ornament Makeover is now complete, ready to hang on your Christmas tree or give as a unique gift. With these simple steps, you can create one-of-a-kind Christmas ornaments that will add a touch of personality to your holiday decor.
Rubber Band Stripe Painting Technique
You're about to add a fun twist to your DIY ornaments with the Rubber Band Stripe Painting Technique.
By applying rubber bands to your ornament in a horizontal pattern, you'll create a unique and colorful design that's sure to stand out on your Christmas tree.
Before you start painting, take a minute to plan out your stripe layout by marking the desired locations with a Sharpie marker to ensure even spacing.
Stripe Painting Techniques
While preparing your ornaments for a festive makeover, consider incorporating the rubber band stripe painting technique to add a playful twist to your holiday decor. This creative approach is perfect for making unique Christmas decorations that will stand out on your tree or mantel.
To get started, wrap rubber bands around your ornaments to create evenly spaced horizontal stripes. Use a Sharpie marker to outline the desired stripe locations on the ornament before applying paint, ensuring accuracy and precision.
Here are three key tips to keep in mind:
- Use an even number of stripes to avoid color repeats and enhance the overall visual appeal of your painted ornament.
- Apply Caviar paint in one coat to fill in the open spaces effectively and achieve a polished look.
- Utilize a heat gun to speed up the drying process of paint, especially when working with slick surfaces like metal ornaments.
Painting Horizontal Stripes
As you prepare to paint horizontal stripes on your ornaments, remember that precision is key to achieving a polished look. To get started, outline the desired stripe locations with a Sharpie marker to ensure even spacing and an equal number of stripes to prevent color repeats. This step is crucial in creating a balanced design that will complement your Christmas Tree decorations.
Next, apply a coat of Slick Stick for adhesion on slick surfaces, followed by painting the ornament with your chosen color, such as Caviar paint from Dixie Belle, to fill in the open spaces.
To create clean, defined lines, use rubber bands to mask off areas while painting. This technique allows for easy adjustments and can create a whimsical look when coupled with bright, contrasting colors.
Once painted, allow the ornaments to dry and then apply two coats of a top coat for added shine and protection of the painted design.
With these simple steps, you'll achieve beautiful, horizontally striped ornaments that will add a touch of elegance to your Christmas Tree.
Caviar Paint Filled Circles Design
You'll love creating a whimsical design using circles with Caviar paint, which adds a luxurious touch to your DIY ornaments.
Start by outlining your desired pattern with a Sharpie marker, making sure to use an even number of circles for a balanced look.
Then, fill in the circles with Caviar paint, applying one coat for a glossy finish that's sure to impress.
Caviar Paint Techniques
Three to five strategically placed circles on your ornament can create a stunning visual impact, especially when filled with vibrant caviar paint.
To achieve this look, start by outlining the circle locations with a Sharpie marker to ensure precision and consistency in your design.
When using caviar paint, remember that one coat is all you need to add texture and depth to your holiday decor.
To create well-defined circles, try freehand drawing or use objects like a quarter as a guide to produce uniform size and shape.
Here are three essential tips to keep in mind when working with caviar paint techniques:
- Combine with other painting methods to elevate the whimsical nature of your ornaments and make them stand out.
- Apply just one coat of caviar paint to achieve an inviting appearance.
- Use guides or templates to ensure precise circle shapes and sizes.
Whimsical Circle Designs
Frequently, the simplest designs can be the most striking, and that's certainly true of whimsical circle designs.
To create these charming ornaments, start by mapping out the desired locations of circles on your ornament using a Sharpie marker to ensure even placement and spacing. You can freehand the circles or use objects like a quarter to trace around for uniformity in size.
Next, use Caviar paint to fill in the open spaces, applying at least one coat for a vibrant finish.
For an added twist, employ rubber bands as a clever hack to section off areas for painting, resulting in visually striking horizontal stripes on your circles. This whimsical design element adds a touch of playfulness to your ornament.
Adding Shine With Top Coat Finish
Across the surface of your DIY Christmas ornaments, a subtle yet striking transformation takes place when you apply a top coat finish, thanks to the added shine and protective benefits it brings.
This extra layer not only adds a glossy finish but also ensures your creations remain durable throughout the holiday season.
To achieve the best results, follow these essential steps:
- Apply two coats: Use Dixie Belle's Top Coat, allowing the first coat to dry completely before applying the second for optimal results.
- Even distribution: Use a brush or sponge to evenly spread the top coat across the ornament's surface, ensuring a seamless finish.
- Dry completely: Allow the second coat to dry completely before displaying your ornaments, ensuring a durable and long-lasting finish.
Unique Coastal Christmas Decorations
You can create a coastal Christmas wonderland by incorporating elements like seashell tree decorations, which add a touch of the ocean to your holiday decor.
To complement these ornaments, consider a coastal color scheme that features vibrant hues reminiscent of tropical waters and sunsets.
Next, explore driftwood ornament ideas that bring the natural beauty of the beach to your Christmas tree.
Seashell Tree Decorations
With a dash of coastal charm, seashell tree decorations bring a unique twist to traditional holiday decor, infusing your Christmas tree with the essence of the ocean. You can create these ornaments using collected seashells, which can be painted or embellished with ribbons and glitter to enhance their visual appeal.
To add texture and interest, incorporate a variety of seashell shapes and sizes.
Here are three ways to make your seashell ornaments truly special:
- Pair them with natural wood accents, like a wooden tree topper or natural wood beads, to create a cohesive coastal look.
- Embellish with beachy ribbons, like jute or burlap, to add a rustic touch to your ornaments.
- Create a memory ornament by writing the location and date of a special beach trip on the shell, making it a meaningful keepsake.
Coastal Color Schemes
How can you infuse your holiday decor with the essence of the coast? Start by incorporating coastal color schemes into your Christmas decorations. Vibrant hues like turquoise, coral, and sandy beige reflect the seaside's natural palette, instantly transporting you to a beachy wonderland.
You can also get creative with non-traditional materials like seashells, starfish, and driftwood to craft ornaments that evoke a unique beach-inspired aesthetic. Brightly painted ornaments in oceanic colors can mimic marine life, while whimsical shapes such as fish or waves add a fun coastal vibe.
To take it a step further, personalize your holiday decor with Christmas stockings featuring coastal patterns like coral motifs or sea turtle designs.
Emphasizing natural elements, such as using tulle garlands in ocean colors or incorporating wool-hooked seaside pillows, will enhance the overall beachy theme. By incorporating these coastal elements, you'll create a holiday space that's both festive and coastal-chic.
Driftwood Ornament Ideas
Collecting driftwood on beach walks becomes a treasure hunt when you envision the unique ornaments you can craft from these weathered pieces.
With a little creativity, you can transform these natural treasures into beautiful driftwood ornaments that capture the essence of the coast.
To get started, consider the following ideas:
- Shape and Design: Craft your driftwood into unique shapes like stars, fish, or Christmas trees, showcasing their natural textures and colors for a rustic coastal vibe.
- Beachy Embellishments: Add seashells, starfish, or twine to enhance the beach theme and add a personal touch to your ornaments.
- Finishing Touches: Paint your driftwood in festive colors like white, blue, or gold, or add glitter for a whimsical sparkle effect to create a cohesive look.
These driftwood ornaments aren't only a cost-effective option, utilizing materials readily found on beaches, but they also promote eco-friendly crafting while celebrating the beauty of coastal designs.
Plus, they're often lightweight, making them easy to hang on trees or wreaths, perfect for both indoor and outdoor settings.
Oversized Wreath Making With Pool Noodles
Transforming your front door or wall into a festive focal point is as easy as bending and shaping pool noodles into a stunning oversized wreath.
To get started, cut the pool noodles into desired lengths and bend them into a circular shape, securing the ends with tape or wire to maintain the structure. You can decorate the outer surface of the wreath with various materials, such as fabric, baubles, or greenery, allowing for personalized and whimsical designs.
Adding embellishments like ribbons, ornaments, or lights enhances the festive look of the oversized wreath, making it an eye-catching focal point for doors or walls.
The best part? Pool noodle wreaths are an affordable and lightweight alternative to traditional wreaths, enabling easy storage and transport when the season is over.
With your creativity and imagination, you can create a one-of-a-kind oversized wreath that reflects your unique style and adds a touch of whimsy to your holiday decor.
Whimsical Christmas Tree Course Details
As you've mastered the art of oversized wreath making, it's time to take your holiday decor to new heights with the Whimsical Christmas Tree Course. This 8-month program is designed to teach you how to create elaborate and playful Christmas tree decor, emphasizing unique ornaments and tree toppers.
You'll learn no-sew techniques for crafting whimsical tree skirts, allowing for creative expression without the need for sewing skills. The course offers a wide array of decorating techniques and designs to inspire creativity and enhance your DIY skills for festive projects.
Here are three key benefits of enrolling in the course:
- Live sessions for real-time guidance: Get immediate feedback and guidance from instructors during live sessions, perfect for those who thrive in a collaborative environment.
- Personalized and festive decorations: Create one-of-a-kind holiday decorations that reflect your unique style and personality.
- Community interaction and support: Join a community of like-minded crafters, share ideas, and get inspired by others' creations.
No-Sew Whimsical Tree Skirt Techniques
With the holiday season just around the corner, you're likely eager to dive into crafting a whimsical tree skirt that showcases your personal style. No-sew whimsical tree skirts are an excellent option, as they utilize fabric remnants or felt, eliminating the need for sewing while maintaining a handcrafted aesthetic.
You can create a unique and personalized design by folding, layering, and tying fabric strips. This technique allows you to incorporate various design motifs, such as festive patterns, textures, and colors that match the holiday theme or your home decor.
To add an extra touch, embellish your no-sew tree skirt with pom poms, ribbons, or decorative trims. These details will enhance the visual appeal of your creation, making it a focal point of your holiday decor.
The best part? These no-sew techniques offer a quick and accessible way to create a one-of-a-kind tree skirt, perfect for engaging families in holiday crafting projects.
With a little creativity, you can craft a whimsical tree skirt that reflects your personality and adds a touch of magic to your holiday celebration.
Embracing Personalized Holiday Decor
Two essential aspects of holiday decor are uniqueness and personal touch, which is why embracing personalized holiday decor can elevate your festive atmosphere.
By incorporating personalized ornaments into your decor, you can reflect your family's traditions and individual creativity, making each piece unique to your household.
Here are three ways to make personalized ornaments a part of your holiday decor:
- Get creative with materials: Utilize affordable materials like wooden embroidery hoops, felt, and fabric scraps to create custom ornaments that resonate with your personal stories and emotions.
- Add personal touches: Incorporate personal touches, such as family names or special dates, into your ornament designs to foster a sense of nostalgia and deeper connection to your holiday celebrations.
- Make them meaningful gifts: Craft personalized ornaments as gifts to share your traditions and memories with friends and loved ones, making them meaningful keepsakes during the festive season.
Final Thoughts
You've just unlocked a treasure trove of whimsical Christmas ornaments to make this season! Imagine adorning your tree with air-dry clay creations that look like they were plucked from a winter wonderland. Take, for instance, Emma's festive fir tree, which she transformed with oversized wreaths made from pool noodles and jumbo finial ornaments. With these 10 projects, you'll be well on your way to crafting a holiday display that's as unique as you are. So, get creative and make this Christmas one to remember!